Here’s a written version of my recent React Orlando talk:
I want to talk about some patterns, principles, and tools for testing react native applications. I’m going to focus a lot on the “patterns and principles” part of the testing equation because, as we all know, the improper use of tools can actually be worse than not having those tools at all.
Michael Scott’s misuse of the fork-lift in Daryl’s warehouse came to mind while I was pondering this truth, and it turns out there’s a gif of this exact moment in the show. Behold:

Of course, there are more serious and more relevant examples of how unprincipled usage of tools can lead to bad outcomes. Here’s a great one from xUnit Test Patterns:
Without this discovery [of how to write tests effectively] we would, at best, have abandoned the automated tests that we had already built. At worst, the tests would have reduced our productivity so much that we would have been unable to deliver on our commitments to the client.1
So we’ll focus on patterns and principles to avoid this kind of situation.2
Another quick caveat: I’ll be talking a lot about react native, but insofar as I focus on principles and patterns, I’m hoping you’ll find insights that’ll apply to straight React apps and to all apps you find yourself working on.
I like to start my talks with TLDRs that map out what we’ll cover. Here’s your map for tonight 🗺️:
You should test. Sometimes “UI” tests are helpful. UI tests should be grey-box. DI + Stubbing can make UI tests faster, less flaky, and more supportive of debugging. Page Object pattern can make tests less brittle and more readable.
You should test
Presumably, you wouldn’t be here if you weren’t somewhat amenable to testing already, so I’ll keep the preaching on why you should test light. Just two quick points.
First, I think everyone knows that testing helps us be confident that our code isn’t broken. I think what’s a bit less understood is just how transformational this confidence can be when it’s achieved at scale. I didn’t fully realize this myself until I saw Mark Zuckerberg talk about how important testing is for Facebook. Here’s the relevant quote from Zuck:

Fun fact: Kent Beck used to work at a facebook, so it makes sense that facebook has managed to achieve such amazing results with their testing infrastructure given that they’ve got the guy who basically invented our automated testing practices as we know them today.
Here’s a second, less appreciated reason, that testing is worth doing. It actually helps with the architecture of your applications. Here’s the quote from Growing Object Oriented Software Guided by Tests that I love to throw around on this subject:
for a class to be easy to unit-test, the class must…be loosely coupled and highly cohesive —in other words, well-designed.3
So, tests help you write better code and they help you sleep at night 😴.
Sometimes “UI” tests are helpful
So, unit tests are great. In fact, as we’ll see in a bit, the majority of our test suite should be made up of unit tests, but one problem with unit tests is that you can wind up in this kind of situation:

So, you can have a bunch of passing unit tests, but your app can still be completely broken in the grand scheme. Now, Martin Fowler actually has a nice quote about what to do in cases where you’ve got failing high level tests but no corresponding unit test warning you about the failure:

The reasoning behind this advice is actually the same reasoning that leads to this testing pyramid floating around on the internets describing a sort of gold ratio of test types:
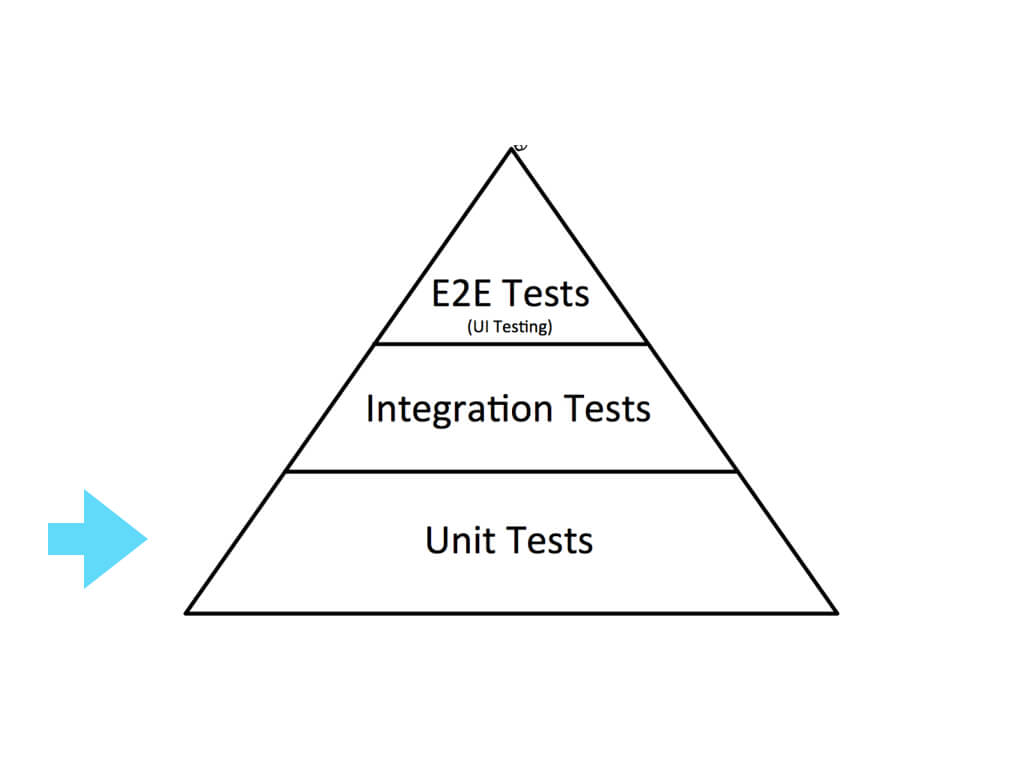
This pyramid is trying to point out that most of your tests should be unit tests. These are fast tests that are testing small pieces of your code. Integration tests, according to pyramid, should make up the second largest set of tests in your suite. These tests test the integration points between your app and other services like a rest API or a database. Finally, at the top we have our End-to-end tests or “UI tests.”
The first principle guiding this “golden ratio” of test types is that we want tests that are fast 🏎️, reliable, and that exhibit high defect localization.
“Defect localization” is a fancy term for talking how much information a test gives us about where the defect in our code is to be found. If an end-to-end test fails, you could be searching 🔍️ through thousands of lines of code for your bug. If a unit tests fails, on the other hand, the test may tell you the exact line of your buggy instruction.
However, we also want tests that have a high chance of catching as many major issues as possible. This is the second principle guiding the test pyramid. Integration and End-to-End tend to shine here, so we trade off speed, stability, and defect localization for more confidence that our system is working correctly.
We’re going to be focusing on UI and End-2-End tests tonight in particular. These two types of tests, as we’ll see, are not exactly the same thing, even though the pyramid suggests otherwise.4
UI tests should be grey-box
To understand what I mean when I say that UI tests should be “grey-box,” let’s talk about three different ways we might write a test for an app that should display a list once you login. The tricky thing about this test is that the app is going to make some network requests during the test, and we have to make sure we aren’t asserting that the app should be displaying a list too quickly.
If we’re writing a black-box test, we’d write a test that knows nothing about the system that its testing. We’d probably use appium, and we’d probably wind up with something like this:
it("should display a list on login”, function () {
  this.timeout(300000);
  return driver
    .elementByAccessibilityId('LoginButton')
    .click()
    .elementByAccessibilityId(‘ProductList’)
      .should.eventually.exist
});
The problem with this test is this timeout line here. The problem is that we actually have no idea what should be passed in to this timeout method. We can find a decent value with trial and error, but that value could change it the network is a bit slower. If the network is especially slow, our test will fail inappropriately. 😞
A white-box test has intimate knowledge of the “System Under Test” (SUT) and its inner workings. Usually white-box tests are unit tests although I think the concepts are really orthogonal.
A grey-box test, as the name implies, has some knowledge of the SUT. If we were writing a grey-box test for the same functionality, it’d look like this:
it('should display a list on login', async () => {
  await element(by.id('loginInput')).typeText('[email protected]');
  await element(by.id('passwordInput')).typeText('test12345');
  await element(by.id('loginButton')).tap();
  await expect(element(by.id('ProductList'))).toBeVisible();
});
Notice that we don’t need to set a timeout here. That’s because the test actually has some knowledge of the app its testing.
More specifically, it knows whether the app its testing is executing a network request. When the app is executing a network request, its smart enough to know that it should be waiting for those requests to resolve before trying to act on or assert the existence of any UI elements.
Now sometimes the auto-synchronization in detox tests doesn’t work perfectly. Unfortunately, right now there’s no way to fine-tine the synchronization in detox tests, but they’re working on a solution for this.
It looks like there’s a trend in testing towards grey-box tests. 📈
Google has released Espresso and EarlGrey for grey-box Android and iOS testing. The test code that we’re looking at here is test from a grey-box Wix library called “detox” that’s actually built on top of both of these technologies. Finally, it looks like appium is working on a driver based on Espresso to take advantage of its auto-syncing capabilities.
So, that’s what the cool kids are doing these days, and its easy to see why. Auto-syncing makes your tests less noisy and flaky. So, your UI tests should be grey-box.
Di + Stubbing can make UI tests faster and more useful
Now, even with auto-syncing that’s available with detox, your UI tests can still be flaky. (Again, imagine a case where the network is down temporarily.) Even if your network works perfectly, your end-to-end tests can be pretty slow because of those same network requests. Even if the slow speed of test doesn’t bother you too much, you also have a test with bad defect localization.
You can solve all of these problems with dependency injection and stubbing.
What is dependency injection?
If you’re not familiar with dependency injection, think about water for a second:

Water is a dependency for us to exist, right? If we’re in good health, we can reach out and grab our own water. On the other hand, if we’re sick, we’ll have to get hooked up to an IV and someone will be responsible for injecting the water into our bodies.
With that in mind, let’s look at some code:
import productsService from '../productsService';

class ShopProductsList extends Component {
  componentDidMount() {
    productsService.fetchProducts()
      .then((response) => {
         this.setState({ products: response.items });
      })
      .catch(error => console.log(`error: ${error}`));
  }
This ShopProductsList depends on a productsService. Its reaching out a grabbing its own dependency.
Contrast that with this way the ShopProductsList gets its productsService:
class ShopProductsList extends Component {
  componentDidMount() {
    this.props.productsService.fetchProducts()
      .then((response) => {
         this.setState({ products: response.items });
      })
      .catch(error => console.log(`error: ${error}`));
  }
In this case, another thing is injecting the dependency into the ShopProductsList just as a nurse might setup an IV to inject water into us. 🚰
DI in React
Now, if you’re going to do DI in react, there’s a couple of things you need to pay attention to:
- How are you going to manage your dependency graph?
- How are you going to get your dependencies into your components?
When I say “graph” here I mean graph as in “graphql” or graphs in discrete mathematics. Here’s a dependency graph for our little app we’ve been testing:
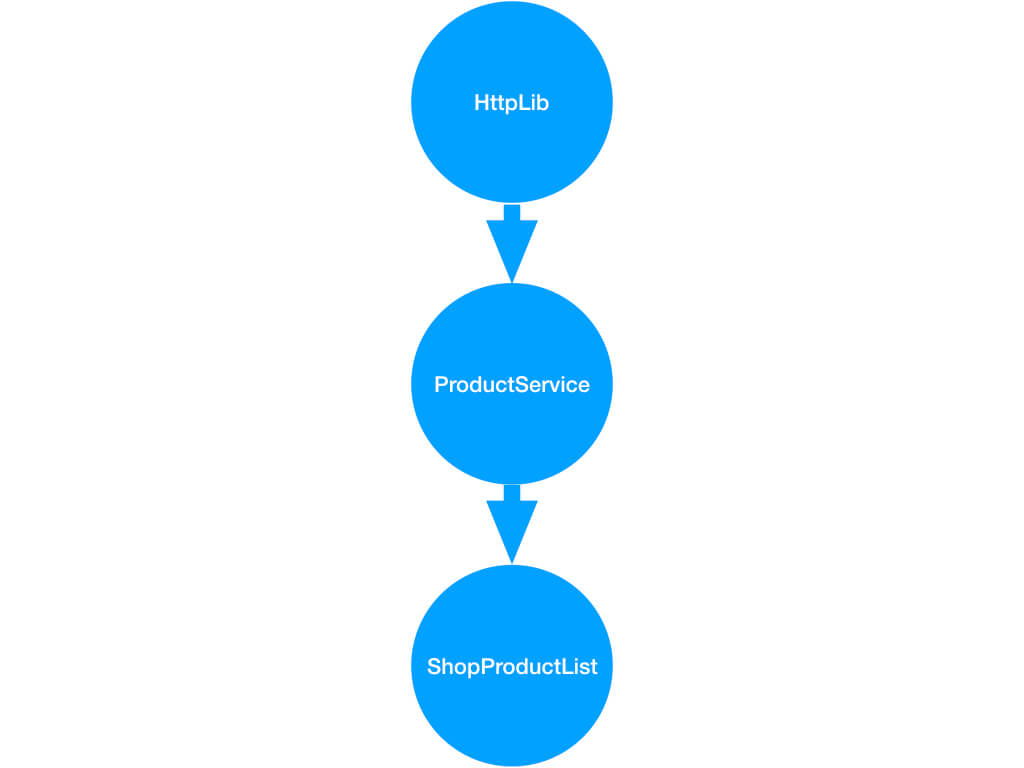
This may not look like much, but if you’re doing DI for your entire app, dependency graphs can get pretty gnarly. If you don’t believe me, check out this java code that’s trying to do DI injection manually.5
This is why we typically use DI libraries to help us manage them. Unfortunately, the DI tooling in javascript isn’t very mature. We’ve really only got two options: Bottlejs and Inversify, and you can only use Inversify if you’re using typescript.
I’m not going to get into the detail of how these libraries work because I’m already short on time 🕗️, but if you’re going to do UI testing you should definitely check them out.
The second issue you need to worry about for doing DI in react is how you’re going to get your dependencies into your components. For this, we can leverage the same pattern that’s used by libraries like react-redux and react-router. 500 tech’s blog post does a decent job of explaining how this can work, but the gist is that you’re going to use React’s Context API and higher-order components.
I rolled my own solution for this in about 50 lines of code following this pattern, so its definitely doable.
Stubbing
Assuming you’ve got DI working in your app, you can actually swap out your dependencies with “stubs,” a fake implementation of your dependencies that return canned data to speed up and stabilize your tests.6 Let’s look at an example.
Ordinarily, when our app runs, we’ll be injecting 💉 a ProductsService that can fetch products for our list:
<ShopProductsList
  productsService={{
    fetchProducts: () => fetch(‘…’)
  }}
/>
However, to make our tests run more quickly and more consistently, we can cut out the network entirely ⛔️ and inject our ShopProductsList component with a stub like this:
<ShopProductsList
  productsService={{
    fetchProducts: () => Promise.resolve([{...}])
  }}
/>
Putting together DI and Stubbing for Hermetic tests
When we cut off our app from the outside world, we’re creating what’s called a “hermetic test,” and now we can finally see why I said earlier that UI tests aren’t necessarily the same thing as an end-to-end test. We’re going to test our app through the UI, but we aren’t testing our system end-to-end if we’re doing a hermetic test.
Now, because we’ve got our DI setup, we can actually configure our dependency injection differently depending on whether we’re running the app in production or whether we’re running tests against it. So, for example, here’s the default index.js file that sets up our DI container with a standard ProductsService:
import initialize from './js/initialize';
import { ProductsService } from './js/productsService';

initialize(user => new ProductsService(user));
Next, we can create an alternative entry point called “testIndex.js” that sets up our DI differently so that our components are getting stub ProductServices:
import initialize from './js/initialize';

/* eslint no-unused-vars: off */
initialize(_ => ({
  fetchProducts: () => Promise.resolve({
    items: [
      {
        name: 'Earings or something',
      },
      {
        name: 'Baby Blankets',
      },
      {
        name: 'Stuff',
      },
    ],
  }),
}));
To do this, we can leverage Xcode Schemes/Targets/Build Settings and change the entry-point that’s used for bundling our javascript. Again, I’m short on time here and there are plenty of blog posts that talk about how to have build variants for iOS apps7, so I’m just going to gloss over this, but the gist here is you:
-
Create a build setting called entry point. For your app target, the value of that setting is going to be index.js
-
Create a new target specifically for testing, and change the value of the build setting to a different file that configures your dependency injection differently.
-
Create a scheme for that target.
-
Expose your build setting through the Info.plist
-
Grab the value of your ENTRY_POINT build setting in your AppDelegate.m and pass it along to react native.
The process for doing this on Android is similar, but I’m not going to cover it because support for detox on Android right now isn’t so great anyway.
Page Object pattern can make tests less brittle and more readable
There’s a part of the testing react native apps with detox that I wasn’t too thrilled about. This meme came to mind when I started thinking about it:

Remember in the above detox test where we were finding elements by id? Here’s the code again just in case you don’t remember this:
it('should display a list on login', async () => {
  await element(by.id('loginInput')).typeText('[email protected]');
  await element(by.id('passwordInput')).typeText('test12345');
  await element(by.id('loginButton')).tap();
  await expect(element(by.id('ProductList'))).toBeVisible();
});
Finding elements by id is actually recommended by the detox docs:
NOTE: Whenever possible we recommend to match elements by.id, these are more resilient to layout restructuring and text/language changes
I think finding elements by Id is a bummer because it forces you to pollute 🏭️ your application code with test code. The id that its using for searching is the testID prop and here’s what it looks like in action:
<View style={styles.container}>
    <AuthTextInput
      testID="loginInput"
      onChangeText={text => this.setState({ ...this.state, username: text })}
      placeholder="Email"
      value={this.state.username}
    />
    <AuthTextInput
      testID="passwordInput"
      placeholder="Password"
      secureTextEntry
      onChangeText={text => this.setState({ ...this.state, password: text })}
      value={this.state.password}
    />
    <View style={styles.authButtonContainer}>
      <AuthButton testID="loginButton" title="Login" onPress={this.onLogin} />
      <AuthButton title="Register" onPress={this.onRegister} />
    </View>
</View>
Fortunately, there’s a way of keeping your tests fairly resilient to text changes that doesn’t require this pollution and it also makes your tests more readable: its called the “page object pattern.” The gist of the pattern is that you encapsulate your element finding code in abstractions of the screen your testing called “pages.” Here’s what this would look like for the login screen that we interact with in our test:
 1class LoginPage {
 2  async enterCredentials(username, password) {
 3    await element(by.id('loginInput')).typeText(username);
 4    await element(by.id('passwordInput')).typeText(password);
 5    return this;
 6  }
 7
 8  async login() {
 9    await element(by.id('loginButton')).tap();
10    return new ShoppingListPage();
11  }
12}
A couple of notes here:
-
If calling a method interacts with a page in such a way that the user is still on that page, we return
thisso that we can chain our method call son that page object. -
If calling a method interacts with a page in such a way that the user is moved to a different screen, we return an instance of the page class that has methods for interacting on that screen.
Now we can get rid of our testID props if we just match elements by title instead:
class LoginPage {
  async enterCredentials(username, password) {
    await element(by.text('Username')).typeText(username);
    await element(by.text('Password')).typeText(password);
    return this;
  }

  async login() {
    await element(by.text('Login')).tap();
    return new ShoppingListPage();
  }
}
Now here’s the kicker: if the text of our elements changes its not a big deal because all we have to do is update our page object instead of having to update all of our tests. The motivation for mixing test code with application code evaporates and with page objects, we get more readable tests to boot 🎉 :
it('should show products on login', async () => {
    new LoginPage()
      .enterCredentials('[email protected]', 'test12345')
      .login()
      .assertVisible();
  });
Conclusion
Well, that’s all I have. Here’s that tldr again to sum up what we’ve covered:
You should test. Sometimes “UI” tests are helpful. UI tests should be grey-box. DI + Stubbing can make UI tests faster, less flaky, and more supportive of debugging. Page Object pattern can make tests less brittle and more readable.
Notes:
-
xUnit Testing Patterns, 27-28. ↩︎
-
I think one of the things that’s been lost in the popularization of TDD is that tests aren’t magic: There’s no guarantee that you can just write some code that makes assertions and wind up with a useful test suite. ↩︎
-
Growing Object Oriented Software Guided by Tests, 43. ↩︎
-
This is just one reason why I’m starting to think the testing pyramid is an outdated way of talking about testing strategy. Turns out there’s an article on Martin Fowler’s blog that takes the testing pyramid to task for this and other shortcomings. ↩︎
-
In this post, the author is actually trying to argue that we don’t need dependency injection container’s. We can just write these massive files that wire up all our dependencies. No thanks. ↩︎
-
A lot of people would probably call this a “mock” instead, but mocks aren’t stubs. The confusion on terminology here has led to some confusion about the importance of mocking libraries in the go community. ↩︎